4: Square Path
- WFU Robotics
- Feb 16, 2021
- 4 min read
Updated: Mar 8, 2021
As usual read the overview, metrics, and instructions. If you feel so inclined you can read and look into the real robot section but that won’t be useful for this virtual exercise. The purpose of this exercise is to use motor sensors, also known as motor encoders, to make the robot’s movements more exact. This is a very common practice in real life robotics because simply using motor velocity or power for a certain amount of time is very inconsistent. Generally, you would create consistent and reliable methods for traversing any distance using encoders, and then use those methods for future navigational tasks. This exercise provides an introduction to those methods. The following process is going to be a bit difficult and probably a bit frustrating (it was those two things for me) so don’t feel discouraged if it takes a bit to figure this one out. One practice that helped me throughout this exercise was using print() statements to see variable values so I would know when I would get to a specific part of my code during the simulation. I also had issues with the compiler thinking my while loops were infinite (when they were not). To fix this I put a short robot.step() to make the compiler think it wasn’t infinitely looping too quickly. Lastly, remember that the encoder tracks rotations in 1 revolution being 2π (radians). I am going to not say much more to give you a chance to figure this out on your own. Below is the solution so I would recommend giving this problem a good try before reading on.
Solution:
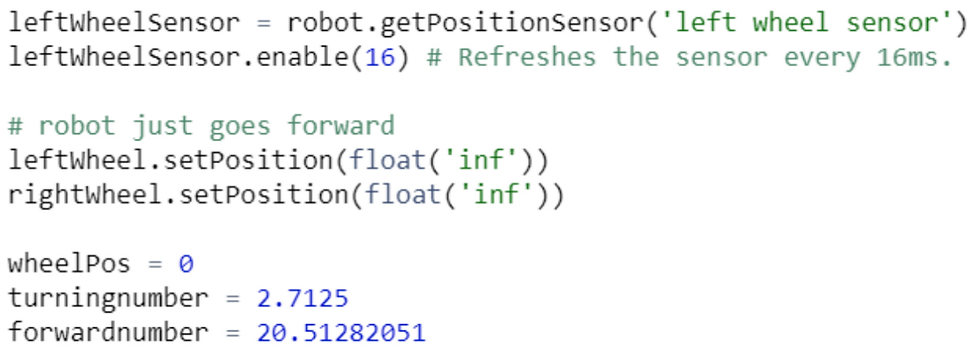
To begin with I initialized and assigned some variables and objects to streamline this process.

Even though the example code uses an encoder on the right wheel, I chose to do one on the left wheel because of the turning method I used. Instead of just activating the left wheel to turn, I had the left wheel and the right wheel go at the same velocity, positive for left and negative for right, to cause the robot to turn. Since we can’t reset the encoder (or more likely I just don’t know how to) values on the left wheel would continue to go up while the values on the right wheel would go down a little. While both are possible to keep track of, I decided to stick with the left wheel since it was adding. Then I set the left and right wheel to infinite position, this means that while the motors have a velocity they will move forward (or backwards) that velocity. I chose to do this since I didn’t want to have to keep track of the position forward the motors are told to go. Instead I am going to set the velocity to different values based on the distance traveled. If you figure out another way to do this, let me know! I figured out something similar in high school and I didn’t want to reinvent the wheel so I decided to stick with the same methodology.
After this I set some variables up. wheelpos is going to be the distance the left wheel spun, turningnumber is the amount of rotations (in π) it takes to do a 90 degree right turn, and forwardnumber is how far the wheels have to turn to travel 2m (the distance of the straight bit). To calculate the turning point number we first have to think about how the robot is turning. Since the left wheel is going forward and the right wheel is going back, the robot should theoretically rotate in a circular manner where the edge of the wheels would make a circle. The radius of this circle would be half the distance between the wheels. From here, with a helpful picture and the circumference of the robot wheels you should be able to find an approximate value for turningnumber and then guess and check for more accuracy. When I started coding I put values that I thought would work to test the code and then I did the math after to find more exact numbers. The numbers in the above image are the numbers I found to work the best.

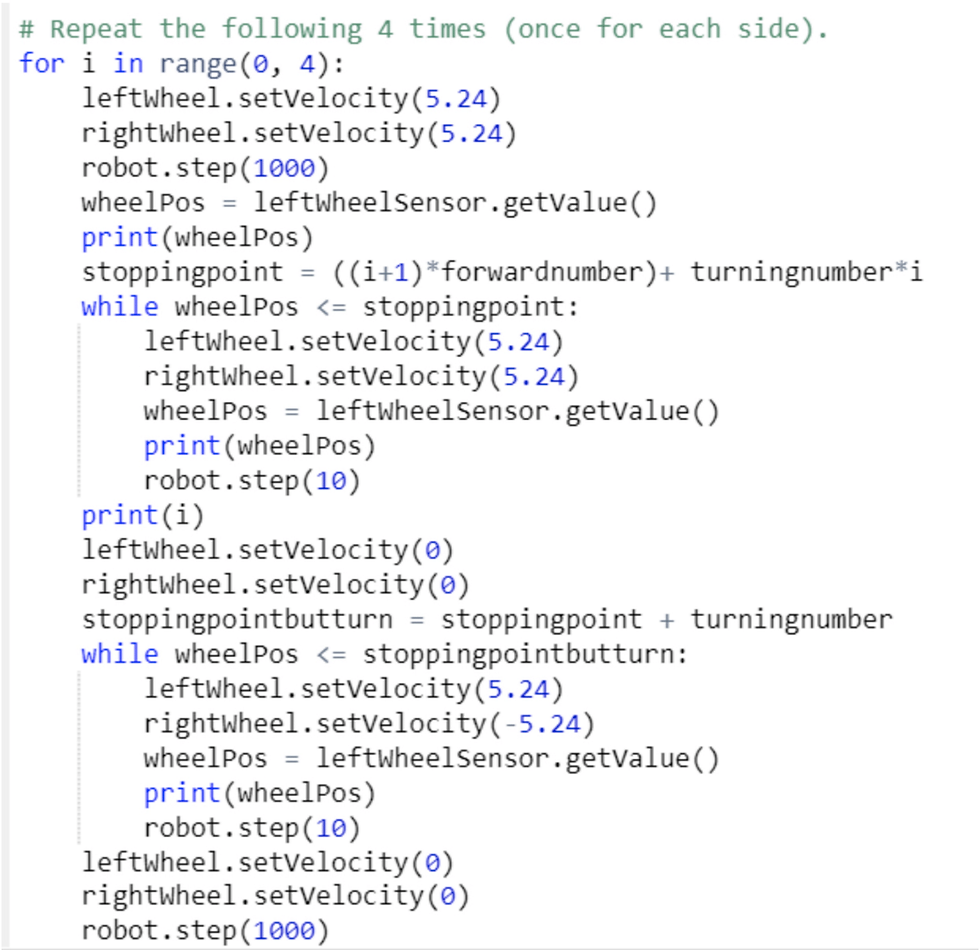
Next I got rid of almost all the code inside the for loop so I could properly implement the encoders. To begin with, I set the motor velocities to the max value and made the program wait a second. This is so the encoders give wheelPos a value besides nan. Then I calculated the stoppingpoint, which is seen above. My logic behind the math is that I want to take into account the straightaway, but not the turn, for the first for loop iteration. But then for the second iteration I wanted to account for 2 straightaways and then one turn. With all this in mind, I created that formula. Then I had a while loop that almost constantly checked if the wheelPos was equal or less than the stoppingpoint. Since going around the square is just doing the same thing four times in a row, putting this in the for loop deals with the other 3 sides. As with all programming challenges, there is more than one way to approach and solve this problem. This will be our last Webots challenge tutorial. If you were able to solve each challenge on your own, or at least understand and be able to recreate my solutions, then you should be equipped to tackle the navigational tasks in real life robotics.


Comments